![]()
You don’t need expensive equipment to take professional looking and beautiful food photography. There are only 3 key elements that you need to follow to take great photographs, and they are 1) lighting, 2) background and 3) props.
And out of those 3 key elements, if you can get good at lighting, you are about 90% of the way to producing great photographs of your dishes and recipes.
Along with food photography basics, tips and ideas, in this tutorial I also talk about:
- The best camera for food blogging and what equipment beginners need
- And recipe submission sites that will help build your blog’s traffic
Quick Links to the Sections Below:
- The 3 Key Elements to Good Food Photography
- Creative Tips For Food Photography – Tricks for Getting the Most Out of Your Photos
- The Best Camera for Food Bloggers
- Recipe Submissions Sites – Getting More Traffic For Your Food Blog
The 3 Key Elements to Good Food Photography
1. Nothing is More Important Than Lighting For Food Photography
If you can get the lighting right, you are about 90% of the way to a great looking photograph. Follow a long with these food photography lighting tips and techniques to easily get great photographs at home.
- Using a Window: The best lighting for food photography, especially for a beginner, is natural light. This is light that comes in from a window or a sliding door. It provides nice soft white light.
- Don’t Use Room Lights: The problem with room lights is that they color your photographs. You’ll see photographs that are very yellow or orange, and this is because room lights were used.
- Going Outdoors: The problem with direct sunlight, say you took your food outdoors, is that you are left with harsh shadows. If you get an overcast day, this could work. But it is best to stick with indoor window lighting.
Taking Food Photos With Natural Light
This mini lighting tutorial will show you how to take photos at home using natural light:
Step 1: Turn off all of the lights in the room
Step 2: Place your food on a table close to the window
Step 3: Since the light is only coming in onto one side of the plate, you want to bounce the light onto the other side of the plate to light it up evenly. You do this by putting up a sheet of white paper / tin foil / or you can get these inexpensive reflectors. So the basic photography setup is to have the window on one side, and the reflector on the other side of your food. You will be able to see the difference the reflector makes when the food is evenly lit – it is subtle, but makes a difference in photo quality.
What To Do When Sunlight Is Limited – Food Photography Lighting Equipment
It can be a pain to try and schedule your photography for when the sun is up. Especially if you live in a place that goes through winter and shorter days, meaning there is low light coming in through the windows.
Avoid using the lights in the room at all costs. Instead check out this table top light box. It is a bit pricey, but it is an all in one home lighting studio solution. For the more budget conscious, check out this table top softbox setup. The good thing about this kit, apart from the price, is that it comes with covers that will diffuse the light creating soft lighting.
Fixing Color
If for some reason you can’t use a window to light up your food and can’t get a light box, then here is a quick way to fix the color of a photograph.
Taking a photograph with room lights will leave it with an unnatural tint. To fix this, open up the photo in Photoshop.
Copy and paste the image.
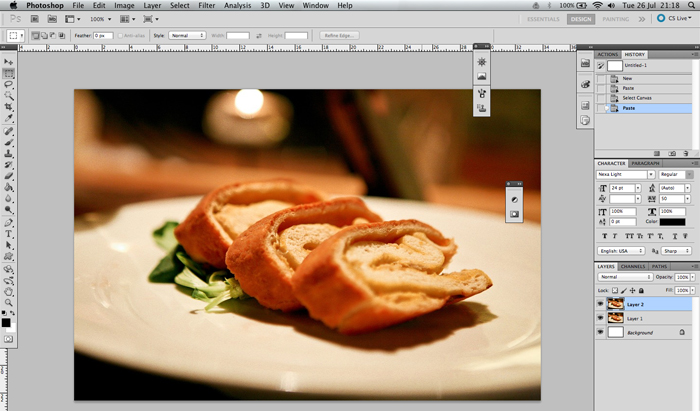
With the top layer selected, go to Image –> Adjustment –> Curves
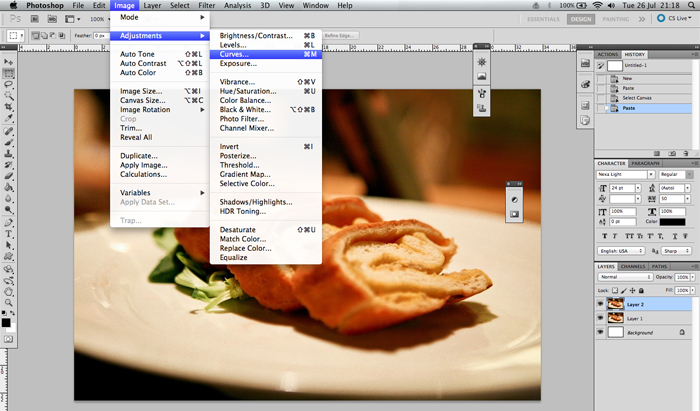
Then click on the 3rd eye dropper icon
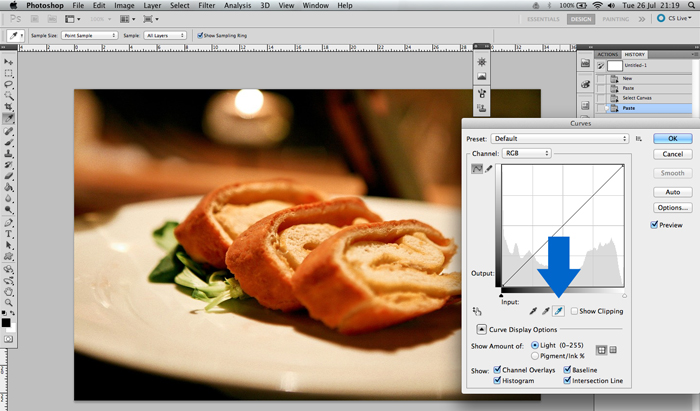
Now you want to start clicking on the whitest areas on the photograph. You can see how it changes the color of the image. Keep clicking on different areas of the photo (the brightest, whitest areas) to find the best white balance for the image. Then click ‘Ok’ when you are done.
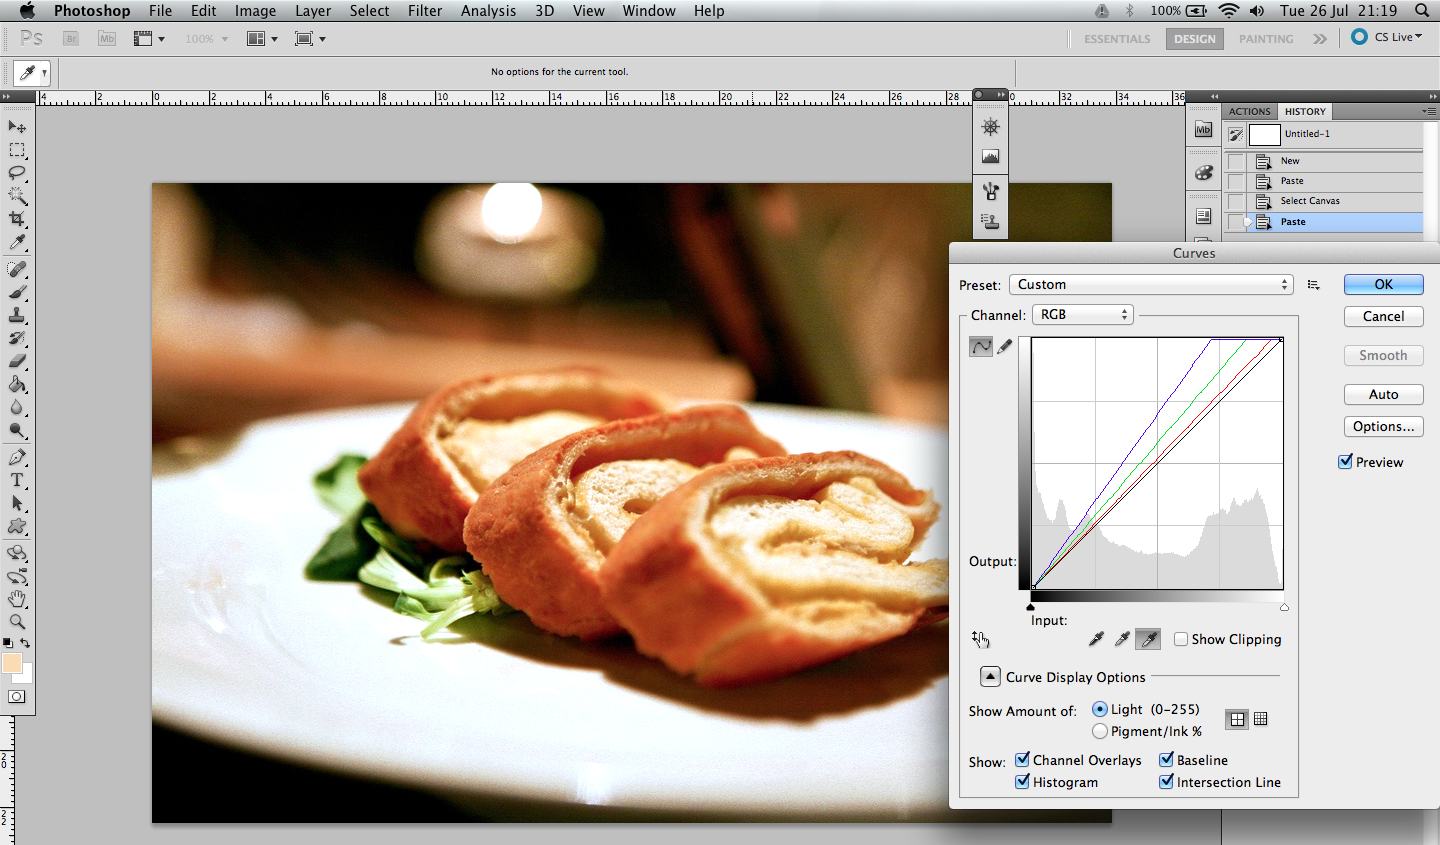
You can play with the opacity of the top layer, so it blends with the bottom image. This helps create a more natural look. Also play with the Levels (Image –> Adjustments –> Levels (moving the middle slider to the right)).
Then go to File –> Save for Web & Devices, to save your image.
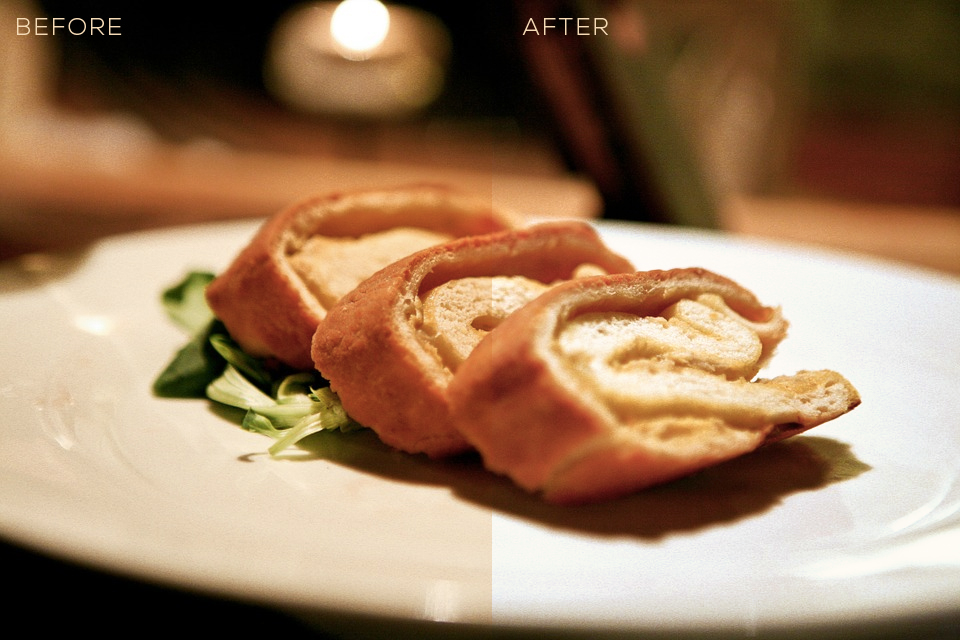
Now that we’ve covered the importance of lighting, and how to easily get the best lighting at home, the next step is to create a photograph that has some character to it. This is done by setting the scene, by using a background and props.
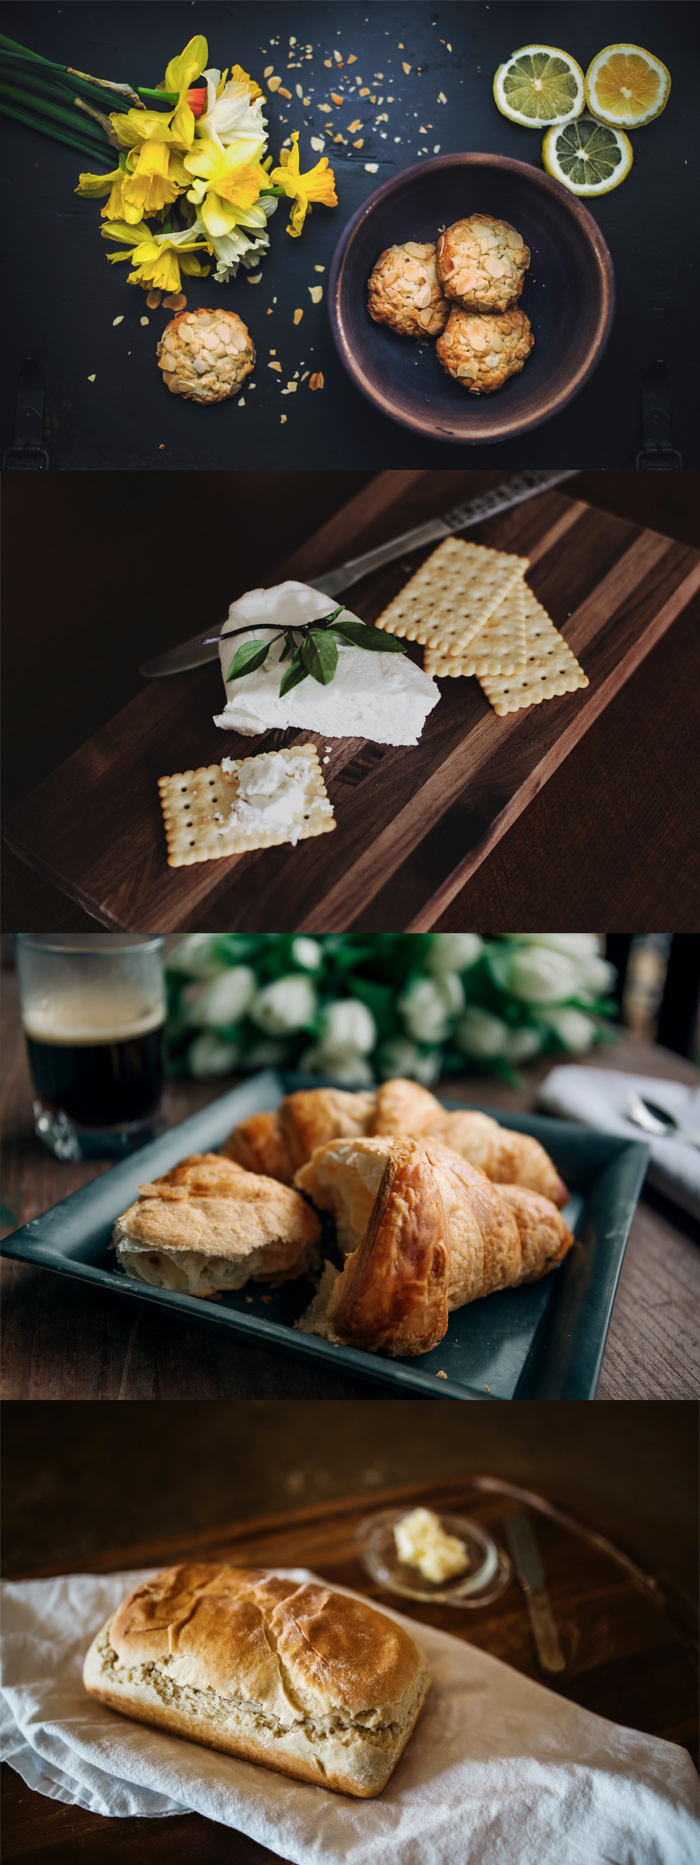
2. Getting The Background Right: Creative Backdrop Ideas
Are you going with rustic wooden planks, or a marble countertop? Are you shooting your baked goods on an oven tray making it look as if they are hot from the oven?
The food needs to be the main focal point – it is what you are blogging about. But things like the background and props tell a story, they set the scene.
When choosing background surfaces try and make sure it doesn’t distract from the food. The simpler it is the better. Here is a list of 13+ food photography backdrop ideas to get you started:
- Simple patterned wallpaper
- Simple patterned or solid colored tablecloth
- Simple patterned or solid colored bed sheet / pillow or cushion case
- Plain white sheet of paper – for a more minimalist look
- Solid colored sheet of paper/cardboard.
- Black cardboard for dark food photographs
- Baking tray (it needs to be big enough so that it covers the entire background of the photograph)
- Wooden cheese or cutting board (needs to fill up the whole background of the photo)
- Elegant serving tray
- A chalkboard
- Painted planks of wood (pastel colors, neon, dark hues)
- A marble slab or countertop
- A large floor tile
For a vintage or rustic look:
- Old wooden planks
- Burlap fabric
3. Creating the Scene – Food Photography Props
The food needs to be the focus of the photograph. This means the plate you use to display the food plays an important role. Using a white plate is the best way to go (or a solid color). Avoid decorative dishes, or plates with different colors.
And use small plates/bowls to put your food on. You don’t want there to be a lot of blank empty space. The food should cover the majority of the plate. That way the background and props have space to add some style to the photograph.
Here are some other things you could use instead of white plates, to give the photo some character:
- Baking sheet
- Baking tray
- Wooden cutting board
Styling With Props
Props give food photography character, life, and a story. Here is a list of ideas on what you can use as props in your photographs:
- Wooden spoons
- Plain or striped kitchen towels / napkins
- Vintage cutlery
- Ingredients
- Knife
- A drink
- Side sauces
- Human hands
- A plant or flowers
Where do you put the props? They can be in the front or in the back – play around, move the objects around to see what looks good. And study good looking food photographs to see how others have done it.
Use the food too if possible – imagine photographing a small dish of popcorn, you can have some of it in the bowl and have some spread out of the bowl on the table.
If you are just getting started, keep it as simple as possible. Get the lighting right, get a good looking background, and maybe add in one prop – such as an ingredient. Once you get more comfortable with the first two key elements of great food photography (lighting and background), then start getting more creative and play around with props.
 Creative Tips For Food Photography – Tricks and Secrets for Getting the Most Out of Your Photos
Here is a quick list of tips to think about when you are photographing your food:
- Finished Dishes vs. Ingredients: This is something I learned during my advertising days. People are more engaged when they see photographs of completed, cooked dishes. So you want your first photograph in your blog post to be an image of the cooked dish. Leave the images of the ingredients and cooking process for later in your post, and focus on getting the best shot of the finished dish.
- Wash Fruit or Vegetables Before Shooting: It gives them a nice gloss and adds water droplets.
- Play With Different Angles When Photographing: Overhead, left, right, low down. It is hard to tell which angle is going to be best until you’ve taken a lot of photographs. Here are some tips: say your dish is tall – a burger, a pile of French fries, or even drinks, then most likely the best shot is from the side. If you have a more flat dish, then a bird’s eye overhead view will most likely be the best angle. Popular angles for the best food photography images are overhead shots and to the side at a slight downwards angle.
- Try Different Arrangements: Just as you play with different angles to see what works best, you also need to move things around in your photograph. Take photos of your food, with and without props. Move the props around. This is how we find out what looks the best.
- Study Other Food Photographs: When you are on Pinterest or Tastespotting, look at the best photographs and see what angle it is shot at, what props and backgrounds are being used. Do this and you will find ideas on how to style your food photographs. Find the best food photographs and set up your shots in the same way. Check out my post of the Top 10: The Best Food Photography by Bloggers to find some inspiration.
 The Best Camera for Food Photography
Most people will have a camera that they can start taking food photographs with. Whether it is a compact point and shoot or a digital camera on their phone. It is good to just get started with what you have, and practice the 3 key elements (lighting, background, and props).
But sooner or later you will want to invest in a DSLR, since you will have more control over the settings and can take better photographs.
If you do get a DSLR, it doesn’t just have to be for your food photographs. It is a great way to capture family events, holidays, or for taking photos of family and friends.
I’ve picked out the 2 best camera recommendations below. One is for the more budget conscious person, and is an entry level camera. The second camera is a higher end one with more features. Both cameras will not only take great food photographs but will also capture HD video so you can start your own Youtube channel for your food blog.
Entry Level Food Blogging Camera
The best entry level DSLR camera for food bloggers is the Canon EOS Rebel T5, an inexpensive camera and a best seller on Amazon. This camera comes with a 18-55mm lens (most cameras can be sold separately from the lens), which is a versatile lens to get started with.
Get the Canon Rebel T5 on Amazon for $399.
Here are some examples of the Canon T5 taking food photographs:
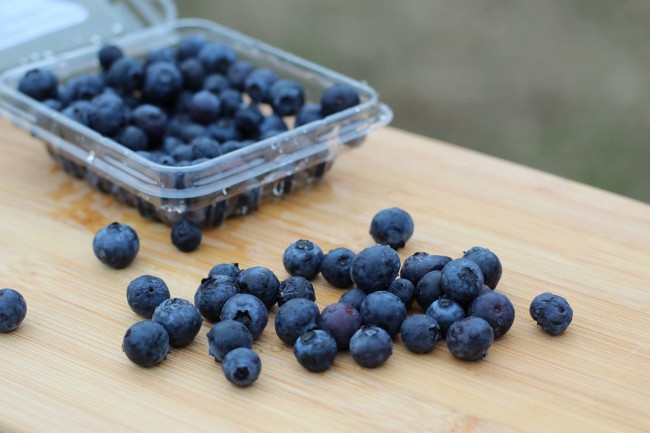
This photo of blueberries was taken by Hobbies On A Budget, using the Canon Rebel T5 and a 50mm lens
If you are just starting your food blog, I would recommend focusing on this entry level camera. Get comfortable with this camera, master it, then much later you’ll be able to know and understand the upgraded features of the next camera.
An entry level camera can also be expanded and upgraded with the use of different lenses. I’ll go over some choices below in the accessories and equipment section.
High End Food Photography Camera
The Canon EOS 6D DSLR is the high end camera choice. It costs $1,499 on Amazon, and that is just for the body of the camera.
More pixels, a better sensor, higher ISO range, is great for shooting video, and is Wi Fi enable. Get your Canon EOS 6D at Amazon.
Essential and Optional Camera Accessories, Gear, and Equipment
There are really only 2 accessories you need after you have chosen your camera.
- Your camera is going to need a memory card to store the photos on. Both the Canon T5 and 6D use this standard SD card. Go for the 32GB card (or higher) which you can get here.
- The second essential accessory that you’ll need is a UV filter. This is a piece of glass that you put on your lens to protect it from scratches and from getting damage. Lenses are expensive, UV filters are cheap. If you are getting the Canon T5 with the packaged kit lens, then this here is the UV filter to get.
How To Edit Your Food Photographs
Stepping outside of the camera equipment world for a second, you will need a way to edit your photos before uploading them to your blog. Photoshop is the way to go – not only will you be able to edit your photos, but you can create Pinterest style graphics to help your blog posts spread online.
Instead of buying a copy of Photoshop, which can be expensive, you can instead get a monthly subscription here that only costs $9.99.
Another Lens
I would recommend getting a macro lens or the 50mm lens by Canon. It is an inexpensive lens. And while you can get a lot out of the kit lens that comes with the T5, a 50mm lens has great depth of field. This means that the background gets really blurry leaving you with a great photograph that highlights your food.
Get the Canon 50mm lens here.
THE ULTIMATE GUIDE
It can be quite daunting getting started with a DSLR camera. There are a lot of settings to play around with. You’ll find tons of classes and photography workshops on Youtube to get you started.
But if you want the ultimate guide on how to learn food photography online (everything from lessons on camera settings, setting up your shot, composition techniques, to editing training) then I can’t recommend the Tasty Food Photography book (ebook) enough. It is written by Lindsay who runs the popular Pinch of Yum food blog.
Recipe Submissions Sites – Getting More Traffic For Your Food Blog
Lastly I just want to point out some websites where you can submit your blog posts to. These sites are great for bringing in traffic to your blog, especially early on.
Check out the websites in the list. Also study the photographs to see how other people are photographing their dishes.
By looking at the photos you’ll be able to see what standard you need to be to get your submissions accepted. A lot of these sites are quite strict when it comes to photography quality. But by following the steps outlines in this guide, you’ll be up to scratch in no time.
Check out more of my 101 guides, from How To Be Successful: Why Do Most New Food Bloggers Fail in the First Month to How To Hire Your First Team Member on the home page guides menu.
Yea! Thanks for the TFP shout out Jacob. Really appreciate that. Hope all is well!
Thanks for stopping by Bjork. And if any of your readers need a good looking an inexpensive food blog logo, send them my way – logo shop.